Browsing Category: Projects

Week 2 of the One Room Challenge – Pool Bathroom

Welcome back all you remodel addicts!

Want to see what a sledge hammer can do?  Yeah, I know you do!

DSCN2193 DSCN2194 DSCN2197


The last picture is a view looking up into my attic space.  The soffit is gone!!  Yippee!!

Ahhh… the feeling of progress.  Oh, it does feel nice.

In case you are still wondering what I’m talking about here, today is the linking party for Week 2 of Calling It Home’s 6 Week Room Challenge.

my orc button 250

You must get your little curious mind over there for some serious inspiration.  People are doing some really fun room remodels!

And in case you need to catch up on where I started, here is Week One.

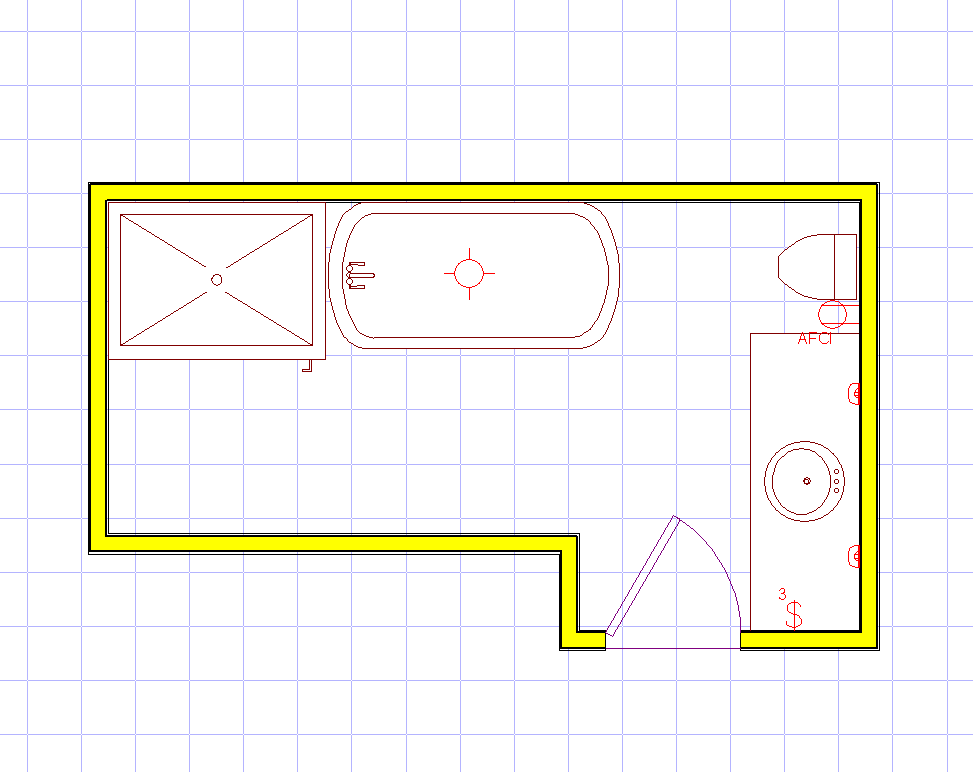
So now that we’ve got all that stuff outta the way, let’s dive into the nitty gritty of completely redoing a room.  You’ve got the stomach for it, you’ve got the urge and the funds, and yeah you’ve picked out some rooms you like, but NOW WHAT?  A layout and reality check is in order.  Si senior… even in home remodel, as in life, we just cannot have “it all.”

bathroom

Focus on your priorities and you’ll be very happy in the end.  Don’t, DON’T get sucked into crazy upgrade land where every bell and whistle will be luring you like a siren.  Focus, Focus, Focus.

So, here were my priorities…

1.  Light!  Lighten and brighten.  Walls be gone!

2.  Functionality – I needed a bath tub and a shower, or combo… since the boys are young now, we would get great use out of the tub, but they grow so fast that it couldn’t dominate the room either.  I had to get a nice sized shower in there too.  And it would be so nice to have easy access to everything so I could shower ’em without too much hassle.

Hence, my open concept bathroom was born!

A shower without doors might not be for everyone, but it will work great for us!

Did you notice that a little sink got scarified in the process?  Well, we started with a long 9 ft vanity and two sinks and shortened it to an extra long 1 sinker.  Do they really need two sinks?  I think not my friends, and honestly, isn’t it just one less for me to clean?

Plumbing in a bathroom is so important so make sure that you are ready for those decisions before you demo.  I highly recommend going to a professional center, either Ferguson or Pacific Sales (or similar in your area) versus an option like Lowe’s or Home Depot.

I’ll tell you why… they know their stuff.  They have better prices on higher end options and more pieces to look at in the store.  Just do it, you will be happy you did.

Another suggestion?  Be prepared to spend a sizable amount of your budget on the fixtures.  Do you really want to have cheap stuff to worry about in a year or two?

Here were the beauties I picked out (after much, much hair pulling)!

Hansgrohe Thermostatic Shower

Hansgrohe-04230000_3

I was between this and the Kohler Purist shower handles and diverter.  In the end, I went with less handles for a more modern look.  And why thermostatic… or what the heck is thermostatic??  Well, it keeps the temperature of the water at a consistent temp, which is great when you have little ones.  You can set the temp and turn the water on and off, but the temperature will remain the same.  It also guards against any scalding that can occur if multiple faucets/toilets are used.  It’s pretty sweet if you ask me, but it’s a splurge and will add about $175 to the cost of the fixture.

Then I got two hand showers… one for the tub area and one for the shower.

images


It just makes my life that much easier.

Rain shower head,  (Hint, the plastic knob-dodads make it easier to clean vs all metal options.)

973036A


The Kohler Purist tub filler, which I just love!  It looks like bamboo… all the others look like, well, you know.

IMG_1169

The Kohler Persuade Toilet

K3753WHx


Symmons sink faucet, but mine is chrome

671256383768lg


And finally, a 63″ free standing acrylic tub that you can find at The Home Depot.  I had quite the stress finding a smallish tub – Hello manufacturers!  Not everyone wants a 70″ tub!  Sheesh!

9b9af144-a9f9-4b66-b349-15174c8b17c5_400


Once you’ve got the pieces filled in (A LOT of work and research, I might add) then the plumbers can do their thang!

DSCN2302

I learned the hard way to expect about 2 weeks for delivery on all my goodies… so plan ahead!!

And that’s what I have to share for this week!  I’ve got to say… my garage is looking mighty full and my living room has become a storage center for tons of boxes.

Progress is messy.

Have a great week!  Happy Creating!  Jessica

Week One – One Room Challenge Spring 2014

Yay!  Yay!  Yay!

The Madness has begun.  And personally, I’m excited.

my orc button 250


Linda, from Calling It Home, is having another 6 week room challenge and this time (deep breath) I AM FINISHING.  The first round, I was like a newborn to this world of blogging and definitely to blog challenges, but this time – oh, this time – I’ve got my act together.  I’d also gotten so sick the first time around (turns out I was pregnant!) that I never did finish, and to this day, it’s a bit of a sore spot.

For this 2nd round, I’ll be showing you all the highs and lows of my pool bathroom remodel.  I call ‘er the pool bath, because the room directly has a door to our backyard/pool area.  No matter what I’ve tried, our guests (including my own family) will go through the kitchen, down a hall (on wood floors, no less) to get to a guest bath rather than just going to the (HELLO!!) bathroom right next to the pool.

Well, things are a’changing.  So the fact that we spend almost all our warm months in the pool and that we’ll have 4 big boys to accommodate in the house, this bathroom just had to get some TLC.

Here it is… Is it any surprise no one really loved using this room?

securedownload-5 securedownload-2 securedownload-3 securedownload-4

The room was not terrible, I’ll admit that.  But it was so gloomy with all those extra walls that my heart yearned for an open concept room and I couldn’t help but sing, Let the Sunshine In, every time I was in there.

The plan?  A full gut.

Here’s where I’m headed… modern, masculine (it’s ultimately for the boys) and a bit luxurious (shouldn’t every bathroom be?)

contemporary-bathroom-1 contemporary-bathroom 7035849755e02a776b5d2647018434fc dbd73eb3c55b53242cd6f9886e762872

Next week I’ll show you a demo’d room and lots of the fun choices I’ve been making!

I’m so excited to get this party started and I can’t wait to share with you all the details!

Have a fabulously creative and inspiring day!  Please visit Calling it Home so that you can see all the other remarkable transformations.  It’s gearing up to be a wild 6 weeks!!

Tootles, Jessica

Mad Hatter Bridal Shower Invitations

Howdy Partners!

Are you all just dying because spring is here?!  ‘Cause I am!  I have this long Spring Cleaning list and crazy preggo nesting syndrome.  Possibly, the greatest combination in the history of my life.  I’m going to get SO MUCH DONE.

Speaking of getting things done, I’m merrily crossing off cute little ideas for my friends bridal shower.  And the first one I want to share with you are the invitations that went out two weeks ago.  Side note – isn’t it so much fun to get an rsvp?!  I’ve got myself a little excel spreadsheet and everything!

Anyhoo… I was inspired by the theme (duh), lace, girlie colors, flowers and cursive font.  I wanted to do a play on being Madly in Love… really, we’ve all got to be a little mad to get married!  Can I get an amen?!

Here’s what I came up with!

DSCN2424

Here are the handy helpers that made my job much, much easier!

DSCN2427

First things first, and this may surprise you, but get the envelope.  I decided to make my own with an envelope maker, a pack of Snow Cap White textured paper, and a roll of adhesive tape runner.  Once you’ve decided on a size, then you can get to designing the actual invitation!

Step 2, was the hardest part since I’m no graphic designer.  I used Word to put together a fun invitation layout and printed out the copies on my home printer.

Using a straight edge paper cutter, I carefully cut out each invitation and affixed them to a separate sheet of colored, texture paper, (which I also cut into separate strips with my cutter).

DSCN2420

For the invitation wrapping, I bought an assortment of purple hued paper in 12×12 sheets.  In this size, I could make the invitation part 6 inches long, and still wrap it with a 12″ long strip.  Less cutting, people, that’s all this means.

Using a continuous paper punch, I made a lace pattern on each side, making sure that the design matched on both sides.

For the finishing touch, I printed out a bunch of “Open Me’s” and then used an label shaped cutter for that!

DSCN2418

With a few inches of ribbon 0.25″ thick, I simply secured the tag, folded each cover to the middle, and made a pretty simple loop instead of a bow.  I tried a few options, but I ended up liking this way the best, but seriously a bow would have been bomb too!

Why so many colors?  Well, I kind of liked the idea that everyone would get something different.

I think they turned out really special!

DSCN2422 DSCN2425

What do you think?  Wanna make your own invitations?!

Did it take me some time?  Yes.  But you know what?  It’s worth it.

At least I think so.

Happy Creating everyone!!  Be inspired!  Jessica